
Sunday, April 26, 2020

Eggs are a must-have for me, as they are apparently for several local chefs and food pros interviewed about their pandemic pantries. Even in normal times, I need at least a dozen eggs in my fridge or I feel bereft. Since I'm shopping less frequently, I now start to get anxious when there are fewer than two cartons. (And there are only two of us in the house.) Luckily, I have had no trouble finding local eggs at farmstands, stores and even delivered to my door.
Beyond their critical contributions to baked goods, eggs are an incredibly versatile, high-quality protein source, relatively inexpensive and comforting for many people. They also keep a long time. From spaghetti carbonara to fried rice to huevos rancheros, eggs turn basic pantry staples or leftovers into a meal the world over. There's a reason #Putaneggonit has more than 120,000 posts on Instagram.
This egg recipe takes us to North Africa. Shakshuka, which is often translated to "all mixed up," is a popular dish in Libya, Tunisia and Israel. Essentially, it's a chunky, spiced tomato and bell pepper sauce with eggs poached in it.

There are a zillion variations out there. Chef and cookbook author Einat Admony calls it "Cinderella in a skillet" in her cookbook Shuk: From Market to Table, the Heart of Israeli Home Cooking (Artisan, 2019). She offers three recipes for it: a classic tomato made with red pepper and eggplant; a Yemenite version with coconut milk and preserved lemon; and a green shakshuka with chard, kale, spinach and feta.
My shakshuka varies with whatever I have on hand. I always start with onion, bell pepper and tomatoes before throwing in any leftover cooked vegetables (from diced roasted squash to mushrooms) and whatever leafy green I have on hand. It's a great way to use up limp greens after refreshing them in cool water. (See photos below of radish greens before and after a 30-minute soak.)
If making shakshuka for supper, I often add a can of chickpeas or white beans for more substance. To finish, I sprinkle the hot skillet with some cheese — ideally feta, but shredded Vermont cheddar works well, too.

Shakshuka was one of the first recipes our younger son, Alex, cooked for himself (not counting Annie's mac and cheese). When I asked for his tips, he texted me, "The longer you cook it, the more tasty it is."
Shakshuka
Makes 4 servingsIngredients
- ⅓ cup olive oil
- 1 medium onion, halved and sliced
- 1 large red, orange or yellow bell pepper, cored and sliced into thin strips
- 2 teaspoons light brown sugar
- 1 teaspoon cumin, or sweet or smoked paprika
- ½ cup chopped parsley, cilantro or scallion greens, plus more to garnish, optional
- 1 (15-ounce) can diced tomatoes
- 1 teaspoon coarse salt, plus more to taste
- Pinch cayenne, plus more to taste
- Small bunch chard, kale, spinach or other greens, sliced into ribbons
- 1½ cups cooked chickpeas or white beans, or diced, cooked sweet potato or winter squash, optional
- 4 to 8 eggs
- ½ cup crumbled feta, fresh goat cheese or shredded cheddar
- In a medium (or large if using all 8 eggs) skillet set over medium-high heat, add oil, onion and pepper. Sauté for 7 to 9 minutes until softened and peppers are starting to color.
- Reduce heat to medium. Add sugar, cumin or paprika, and herbs, if using. Stir to combine. Cook for a couple minutes.
- Stir in tomatoes and a ½ cup or so of water swirled in the empty tomato can to get all the tomato goodness out. Add 1 teaspoon salt and pinch of cayenne. Stir in greens. Reduce heat to low and simmer, about 12 to 15 minutes, stirring a couple times. Taste and add more salt or cayenne as desired. (Flavor will intensify as you continue to cook, as Alex pointed out.)
- Increase heat to medium. Stir in chickpeas, beans or cooked sweet potato or squash, if using, and cook about 5 to 7 minutes until they are warmed through.
- Reduce heat to low. Use a large spoon to make well-spaced, individual depressions in the tomato mixture and crack eggs carefully into each hole. Season eggs with salt and more cayenne, as desired.
- Cover pan and cook eggs until done to your liking, about 8 minutes for just set and more for harder cooked eggs. Immediately sprinkle with cheese and additional chopped herbs, if using.
- Serve hot straight from the pan into shallow bowls with crusty bread on the side.
Got cooking questions? Feel free to email them to [email protected].
Tags: Recipes , shakshuka , eggs , pantry basics , Web Only , Image
Friday, April 24, 2020

The Weltons took the rest of 2019 off. On New Year’s Eve, taking stock and looking forward, they asked each other: "So, what are we going to do now?" Mara recalled.
The couple decided it was time to look for jobs. Mara and Spencer updated their resumes for the first time in 16 years and sent out cover letters. They had interviews and received callbacks for positions in Vermont’s food and agriculture sectors, Mara said.
No one hired them.
“We were mind-boggled,” Mara said. “I guess the universe was telling us, 'Working for other people is not for you.'”
But that was OK, she said. The Weltons, a couple since high school in Denver and married for 27 years, enjoy working together and running a business. So this spring, they launched a new business: Chile Colorado, a mobile eatery that serves food from their native Southwest.
“We’ve always come back over and over to the idea of bringing southwestern food to Vermont,” Mara said. “It’s our passion. It’s what we crave.”
The Weltons purchased two food carts from Carte Blanche, rigs that earlier belonged to Burlington taqueria Taco Gordo.
“They have a nice legacy here in Burlington,” Mara said of the carts.
Cooking out of their home kitchen in the New North End, which is licensed for catering, the Weltons make dishes including enchiladas, posole, nachos, burritos, tostados and chile Colorado. (They had offered southwestern fare at the Burlington winter farmers market for a few years after Tropical Storm Irene in 2011.)
Chile Colorado offers free delivery, Monday through Wednesday, to six Chittenden County towns. It has curbside service from 3 to 7 p.m. on Fridays at Simple Roots Brewing in the Burlington's New North End, and on Friday and Sunday mornings outside the Weltons' home.
The plan is to set up one cart at the Elks Lodge on North Avenue in late May or early June. (Check Chile Colorado’s social media for updates on locations and dates.)
The Weltons shared the recipe for their business' namesake dish, chile Colorado, with Seven Days.

Chile Colorado
Ingredients- 2 pounds stew beef, cut in 1-inch chunks
- 5 tablespoons oil
- 1 cup chopped onion
- 3 cloves chopped garlic
- 3 tablespoons flour
- 3 tablespoons chile powder, New Mexican medium hot
- 2 teaspoons Mexican oregano
- 2 cups water
- 2 to 3 cups chile Colorado sauce (rojo chile)
- 18 dried red New Mexican chiles or a mix of guajillos, pasillas and Anaheims
- Make chile Colorado sauce: Preheat low broiler. De-stem chiles and break them up into 1-2" pieces. Spread chile pieces and seeds onto a dry baking sheet.
- Place tray of chiles under the broiler, leaving the oven door open! You must stand there and watch the chiles so they don't burn. Pull them out every 20 seconds or so and toss them as they curl and toast. When they are fragrant and seem toasty (they'll darken in color), they are done. The whole toasting process is very fast and takes 1-2 minutes. Don't walk away, they will burn!
- Add toasted chiles and about half the seeds to a blender along with 1 clove of garlic and 1 teaspoon salt. Cover with warm water and let sit while chiles soften, about 10 to 20 minutes. Blend on high until you have a puree. If it is too thick to blend well, add more water. When completely smooth, set aside and reserve blender for later in the recipe.
- Start the rest of the recipe. Add 2 tablespoons oil to Dutch oven (or heavy-bottomed 4 quart pan with a lid) and heat on medium-high. When hot, brown meat in batches — don't crowd the pan — adding oil as needed. Using tongs, flip meat as it browns to sear each side. Remove meat to a plate as it cooks and continue until all meat is browned.
- Lower heat and add onion and garlic to Dutch oven. Cook until soft, but not browned. Add oregano, rubbing it between your hands as you add it. Stir to combine.
- Sprinkle flour and chile powder over the cooked garlic and onions and stir until it forms a paste.
- Add 1 cup water and stir to make a roux. Add 1 cup more water and whisk to combine. Raise heat and add 1 cup of the chile Colorado. Heat to a low boil for 2 minutes.
- Add 1 cup of the reserved chile Colorado back to the blender, and pour the hot chile sauce from the Dutch oven into the blender. Blend carefully until smooth and return to Dutch oven, heat again to a low boil.
- Add meat back to pot. Cover and return to a low boil. Reduce heat to simmer and cook until meat is tender and sauce has thickened somewhat, 2-3 hours. Add more chile Colorado or water if mixture gets too thick.
- Serve with pinto beans, Spanish rice and warm flour tortillas.
Tags: Recipes , Home on the Range , chlie Colorado , Half Pint Farm , Burlington , home cooking , New North End , Chile Colorado , Web Only , Image
Monday, April 20, 2020

That seems to be the name of the game these days, in all things.
The rural supermarket where Conor goes for groceries every couple weeks does not offer the breadth of options that he and my little sister, Julia, are used to in New York City. And because she is pregnant, he is the designated (but less experienced) shopper. That can yield some mix-ups, such as when he brought home frozen collard greens instead of spinach. So we try to keep things simple.
To help out, I sent them a box of spices and other goodies, including a tagine blend I had in my overflow spice drawer. (Don't mention that drawer to my husband; it drives him crazy. It does come in handy in pandemic times, though.) The mix of eight warm spices incorporates cinnamon, ginger, cardamom and coriander. Along with a big package of ground turkey Conor had bought, and local lamb in my own fridge, it inspired these Middle Eastern-ish kofta kebabs.
Traditionally, kofta are made from ground beef or lamb shaped into long sausages on skewers and grilled. You can make them with pretty much any ground meat; skewers and grilling are optional. I simplified the spice mix in mine and used fresh parsley, which I happened to have on hand; Conor used dried parsley flakes. We roasted them in a hot oven, though you could definitely grill them if the weather ever gets warm enough.
We whisked together a simple yogurt sauce to go with them. I used grated cucumber and mixed in more parsley and some mint; Conor used grated radish, which made for a Pepto-Bismol hue but good flavor.

Serve the kofta with rice (as Conor did) or pita bread. I finally used a jar of cracked wheat I've had in the pantry for too long. It was so simple, I don't know what took me so long. I rinsed it and submerged it in boiling water. Twenty-five minutes later, I had the basis for a quick tabbouleh with the addition of lemon juice, a little olive oil, more chopped parsley and cucumber, olives, tomatoes, bell peppers and a sprinkle of feta for good measure.
For something so easy, the results were really very good. So good, in fact, that Julia even awarded her husband with his first A- cooking grade. We were all very proud.

Kofta Kebabs with Yogurt Sauce
Makes 2-4 servings (depending if one of you is pregnant or just really hungry)Ingredients
For kebabs:
- Oil to grease pan if desired
- 1 teaspoon ground cumin
- 1 teaspoon ground coriander (sub: ½ teaspoon more cumin)
- ½ teaspoon cinnamon
- ½ teaspoon coarse salt
- ¼ teaspoon sweet, hot or smoked paprika (sub: pinch cayenne)
- 1 pound ground meat (I can't think of one that won't work; I first made these with goat and assume it would work with plant-based ground "meat")
- 1 small onion, grated or finely minced to yield about ⅓ cup
- ¼ cup finely chopped parsley (sub: 2 tablespoons minced scallion greens or chives; or 1 tablespoon dried parsley or chives)
- 1½ cups plain yogurt (if it is a loose yogurt, strain in a paper-towel-lined, fine mesh sieve while you prepare kebabs)
- 1 cup shredded cucumber (no need to peel), squeezed dry (sub: shredded radish or skip)
- ½ cup finely chopped green herbs, such as parsley, mint or cilantro (sub: 1 tablespoon dried parsley, mint or chives)
- ½ teaspoon coarse salt, plus more to taste
- A good squeeze of lemon juice (sub: Julia's inspired idea to use caper juice, olive juice or even pepperoncini juice)
- Heat oven to 375 degrees. Line a rimmed cookie sheet or shallow roasting pan with foil for easier cleanup if you like, or lightly oil unlined pan. (If straining yogurt for sauce, start that here.)
- In a medium mixing bowl, whisk together cumin, coriander, cinnamon, salt and paprika.
- Add ground meat, onion and parsley to bowl and mix together well. (Hands work well here and you'll use them to shape the kebabs, so they're going to get messy anyway.)
- Divide meat mixture into 8 portions. (It helps to divide the whole lump in half first, then each of those halves into quarters.) Form each portion into a sausage shape about 4 inches long.
- Arrange kebabs on prepared pan and cook 20-25 minutes until browned and cooked through.
- While kebabs are cooking, in a small serving bowl, whisk together yogurt, cucumber, herbs and ½ teaspoon salt. Taste and add lemon juice and salt, as desired.
- Serve kebabs with yogurt sauce over rice, or with pita breads or tabbouleh.
Got cooking questions? Feel free to email them to [email protected].
Tags: Recipes , home cooking , kebabs , Middle Eastern , Web Only , Image
Thursday, April 16, 2020

Contos switched her focus last summer, closing her Shelburne culinary classroom and store, Chef Contos, after more than six years. At the time, she told Seven Days that she was moving things online to open a functional medicine and wellness coaching business.
With that new business, Contos was a pre-pandemic adopter of Zoom — the now-ubiquitous video conferencing platform — using it to work with clients to make diet and lifestyle changes. Now that we're all staying home, she's hosting virtual cooking classes, too.
"I had a couple reach out and say, 'We're at home, we need some inspiration and enthusiasm. We're in a rut and cooking the same things over and over,'" Contos recalled. With the online platform already in place, she decided to jump in and start offering the classes — all priced affordably at $11 — with the goal of bringing people together.
While she's taught plenty of cooking classes over the years — she estimates between 1,300 and 1,500 — the first virtual version was an adjustment.

"They've all been in front of people!" Contos said of her previous classes. "This was an experiment, to translate what I've done so many times with people's energy right in front of me and do it through the screen."
So far, the online classes have been a success. The first had attendees tuning in from Germany, Canada and Mexico. It even had a birthday celebration.
"The food was great, and people were excited to see what I was cooking, but it was about way more than the food," Contos explained. "People felt a sense of togetherness, and they had this time to really forget about what was happening and interact."
The 45-minute classes include recipes, tips and resources for far-flung, flavorful food. Upcoming themes include Latin comfort food, samosas and chutney, and a Taco Tuesday party. Contos is happy to share the recipes beforehand for attendees who want to cook along, but she said the classes, ahem, "zoom by even if you're just watching."
"As a health coach — and someone who overcame an autoimmune condition — I feel that nutrition is a big player right now in keeping our immune systems strong," Contos said. One of her favorite ways to get families to eat more vegetables is via a flexible vegetable pancake recipe, served either with a tahini-miso sauce or with a simple yogurt sauce.
"It's a basic recipe that I share with all my clients," Contos said. "They taste so good, and people can use whatever vegetables they have."
Contos challenges herself to use six different types of vegetables when she prepares the pancakes, but they work just as well if all you have is frozen cauliflower. Or spinach. Or kale.
"You could use just carrots and it would still taste awesome," Contos said, at the end of a long list of vegetable suggestions. And isn't that the kind of recipe that we all really need right now?
Vegetable Pancakes
Makes 4 servingsIngredients
- 1/2 cup chickpea flour (sub: paleo flour or all-purpose flour)
- 1 teaspoon turmeric
- 2 teaspoons garam masala (or a favorite curry spice)
- 1 teaspoon ground coriander
- 1/2 teaspoon salt
- Freshly ground pepper (to taste)
- 3 eggs
- 1 tablespoon lemon juice
- 1/4 cup water
- 1/2 cup sliced onion
- 5-6 cups chopped or grated vegetables (cauliflower, roasted red peppers, kale, sweet potato, scallion, onion, fresh or frozen spinach, cabbage and canned artichokes are all great options, but use whatever you have on hand!)
- Avocado oil for frying
- Mix the dry ingredients in a large bowl.
- Add eggs, lemon juice and water, then whisk until all the lumps are out.
- Fold vegetables into the batter.
- Heat a heavy iron pan on medium-high heat, adding enough oil to cover the pan.
- Spoon some of the batter on the pan, fitting as many pancakes as you can on the pan you use. Lightly press down on each with a spatula. Cover the pan when the first side is cooking, and cook until browned. You should be able to lift the pancake easily when it is ready.
- Flip and cook uncovered on the other side.
- Repeat with the rest of the batter, adding more oil as needed.
- Serve with green tahini miso sauce (recipe below) or yogurt.
Green Tahini Miso Sauce
Ingredients- 2 tablespoons white miso
- 3 tablespoons tahini (sub: nut butter)
- Dash of toasted sesame oil
- 2-3 tablespoons apple cider vinegar (sub: lemon juice)
- 1 clove fresh garlic
- 3-4 tablespoons water
- Fresh herbs, such as dill, mint or parsley (use a touch of all, or substitute whatever you have on hand)
- Salt and pepper (to taste)
- Dash of your favorite hot sauce (optional)
- Blend all ingredients.
- Enjoy!
Tags: recipes , Home on the Range , vegetable pancakes , virtual cooking class , home cooking , flexible recipes , Courtney Contos , Web Only , Image
Monday, April 13, 2020

When our two sons first started cooking for themselves, they’d often text or call me for advice. I came up with two basic recipe methods that were inexpensive, flexible and quick. One was a Mexican-style rice and bean casserole, and the other a boilerplate for Asian stir-fry or fried rice.
The bonus is that both meals can swallow up all manner of bits and bobs that tend to get lost in the back of the fridge. Cutting food waste is always a good idea. These days it’s an even better one.
This fried rice was inspired by writer and chef Tamar Adler’s recipe for Thai fried rice in her book An Everlasting Meal: Cooking with Economy and Grace (Scribner, 2011). I love the funk of fish sauce, but soy sauce works fine if you're not a fan (like my boys) or don’t have it on hand.
Once you’ve got everything chopped, the fried rice is super quick to pull together — so quick, in fact, you’ll want the ingredients laid out ready to go before you turn on the stove.
The only thing that you need to plan ahead is having cold cooked rice, the kind you might have left over from Asian takeout. Or, if you’re making rice for another meal, cook extra. You can store it in the fridge for a few days, or even freeze and then thaw it.
Do not even think about making this dish with freshly cooked rice. It will be a dismal failure. As Adler writes, “Thank heavens for the occasional, calculable superiority of old things.”
The vegetables can be pretty much anything you have on hand. I especially like to use stems or leaves that might normally get tossed. Thinly slice kale stems or broccoli stems, or the inner stalks and leaves of celery; ribbon up radish or beet greens. (If those greens are a little limp, soak them in cool water for an hour or so and you'll be amazed by how they come back to life.)

I’ve made this with finely diced ham, chicken, smoked tofu — even leftover fried calamari. You can scramble a couple eggs into the rice after it’s crisped up, but my favorite way to finish it off is with a runny-yolked fried egg, a shower of chopped green herbs and something crunchy. Roasted peanuts are perfect, but crushed potato chips are also a surprisingly great option.
Adler does not include potato chips in her recipe, but I think she might agree that using up those bits stuck at the bottom of the bag is the epitome of cooking with economy and grace.
Fridge-Foraged Fried Rice
Makes 2 servings (can be multiplied, but fry rice in batches so it gets crispy)
Ingredients
- 2 to 3 bacon strips, thinly sliced, optional
- About 3 tablespoons peanut oil, divided (sub: any vegetable oil)
- 2 cups sliced vegetables
- 1 medium shallot, thinly sliced (sub: 1/4 cup sliced onion or scallions)
- 3 cloves garlic, sliced lengthwise
- 1 teaspoon crushed red pepper flakes, plus more to taste
- 2 to 3 teaspoons Thai fish sauce, divided (sub: soy sauce or Asian stir-fry sauce)
- 2 cups cold cooked rice
- 1 lime (sub: bottled lime juice or rice vinegar to taste)
- 3/4 teaspoon sugar
- Salt, to taste
- Egg per person, optional (or any leftover cooked meats, seafood, tofu or seitan, diced small)
- 1/2 chopped cilantro (sub: fresh green herb such as mint, basil, parsley)
- Chopped roasted peanuts, optional (sub: toasted sesame seeds, packaged fried onion rings or even crumbled potato chips)
Directions
- Prepare and measure out all ingredients. Turn on your kitchen fan.
- If using bacon, cook it over medium heat in a large flat-bottomed sauté pan or wok just until crisp. Remove bacon to a plate lined with paper towel. Add enough oil to pan to measure about 1 tablespoon total fat, including bacon fat if you cooked bacon.
- Increase heat to medium high. When a drop of water sizzles in the oil, add the sturdiest vegetables (I started with kale stems and cabbage) and cook 3 to 4 minutes, stirring. Add remaining vegetables (for me, this was sliced radishes and mushrooms) along with shallots, garlic and crushed red pepper. Cook, stirring a few times, another 4 to 5 minutes until vegetables are cooked to your liking. Splash in about 1 teaspoon of the fish sauce and cook 1 more minute. Remove vegetables to a plate.
- Set pan back over medium-high heat and add remaining 2 tablespoons oil. When a drop of water sizzles in the oil, add rice, spreading it out to cover the pan. Let it cook without stirring for 2 to 3 minutes, then add 1 teaspoon fish sauce and turn rice over to crisp up as much of it as possible. Cook another 2 to 3 minutes.
- If using eggs, while rice is cooking, set a frying pan over medium heat with a little oil and fry eggs.
- When rice is crispy, if using other meats or proteins, toss those in and warm through. Then return vegetables and bacon, if used, to the pan. Sprinkle in sugar and a good squeeze of lime juice and toss to combine. Taste and add more fish sauce, lime juice or a little salt if desired.
- Serve fried rice topped with eggs, if using. Shower with chopped herbs, peanuts, another sprinkle of crushed red pepper flakes, and serve with lime wedges.
Got cooking questions? Feel free to email them to [email protected].
Tags: Recipes , Home on the Range , fried rice , food waste , Web Only , Image
Friday, April 10, 2020
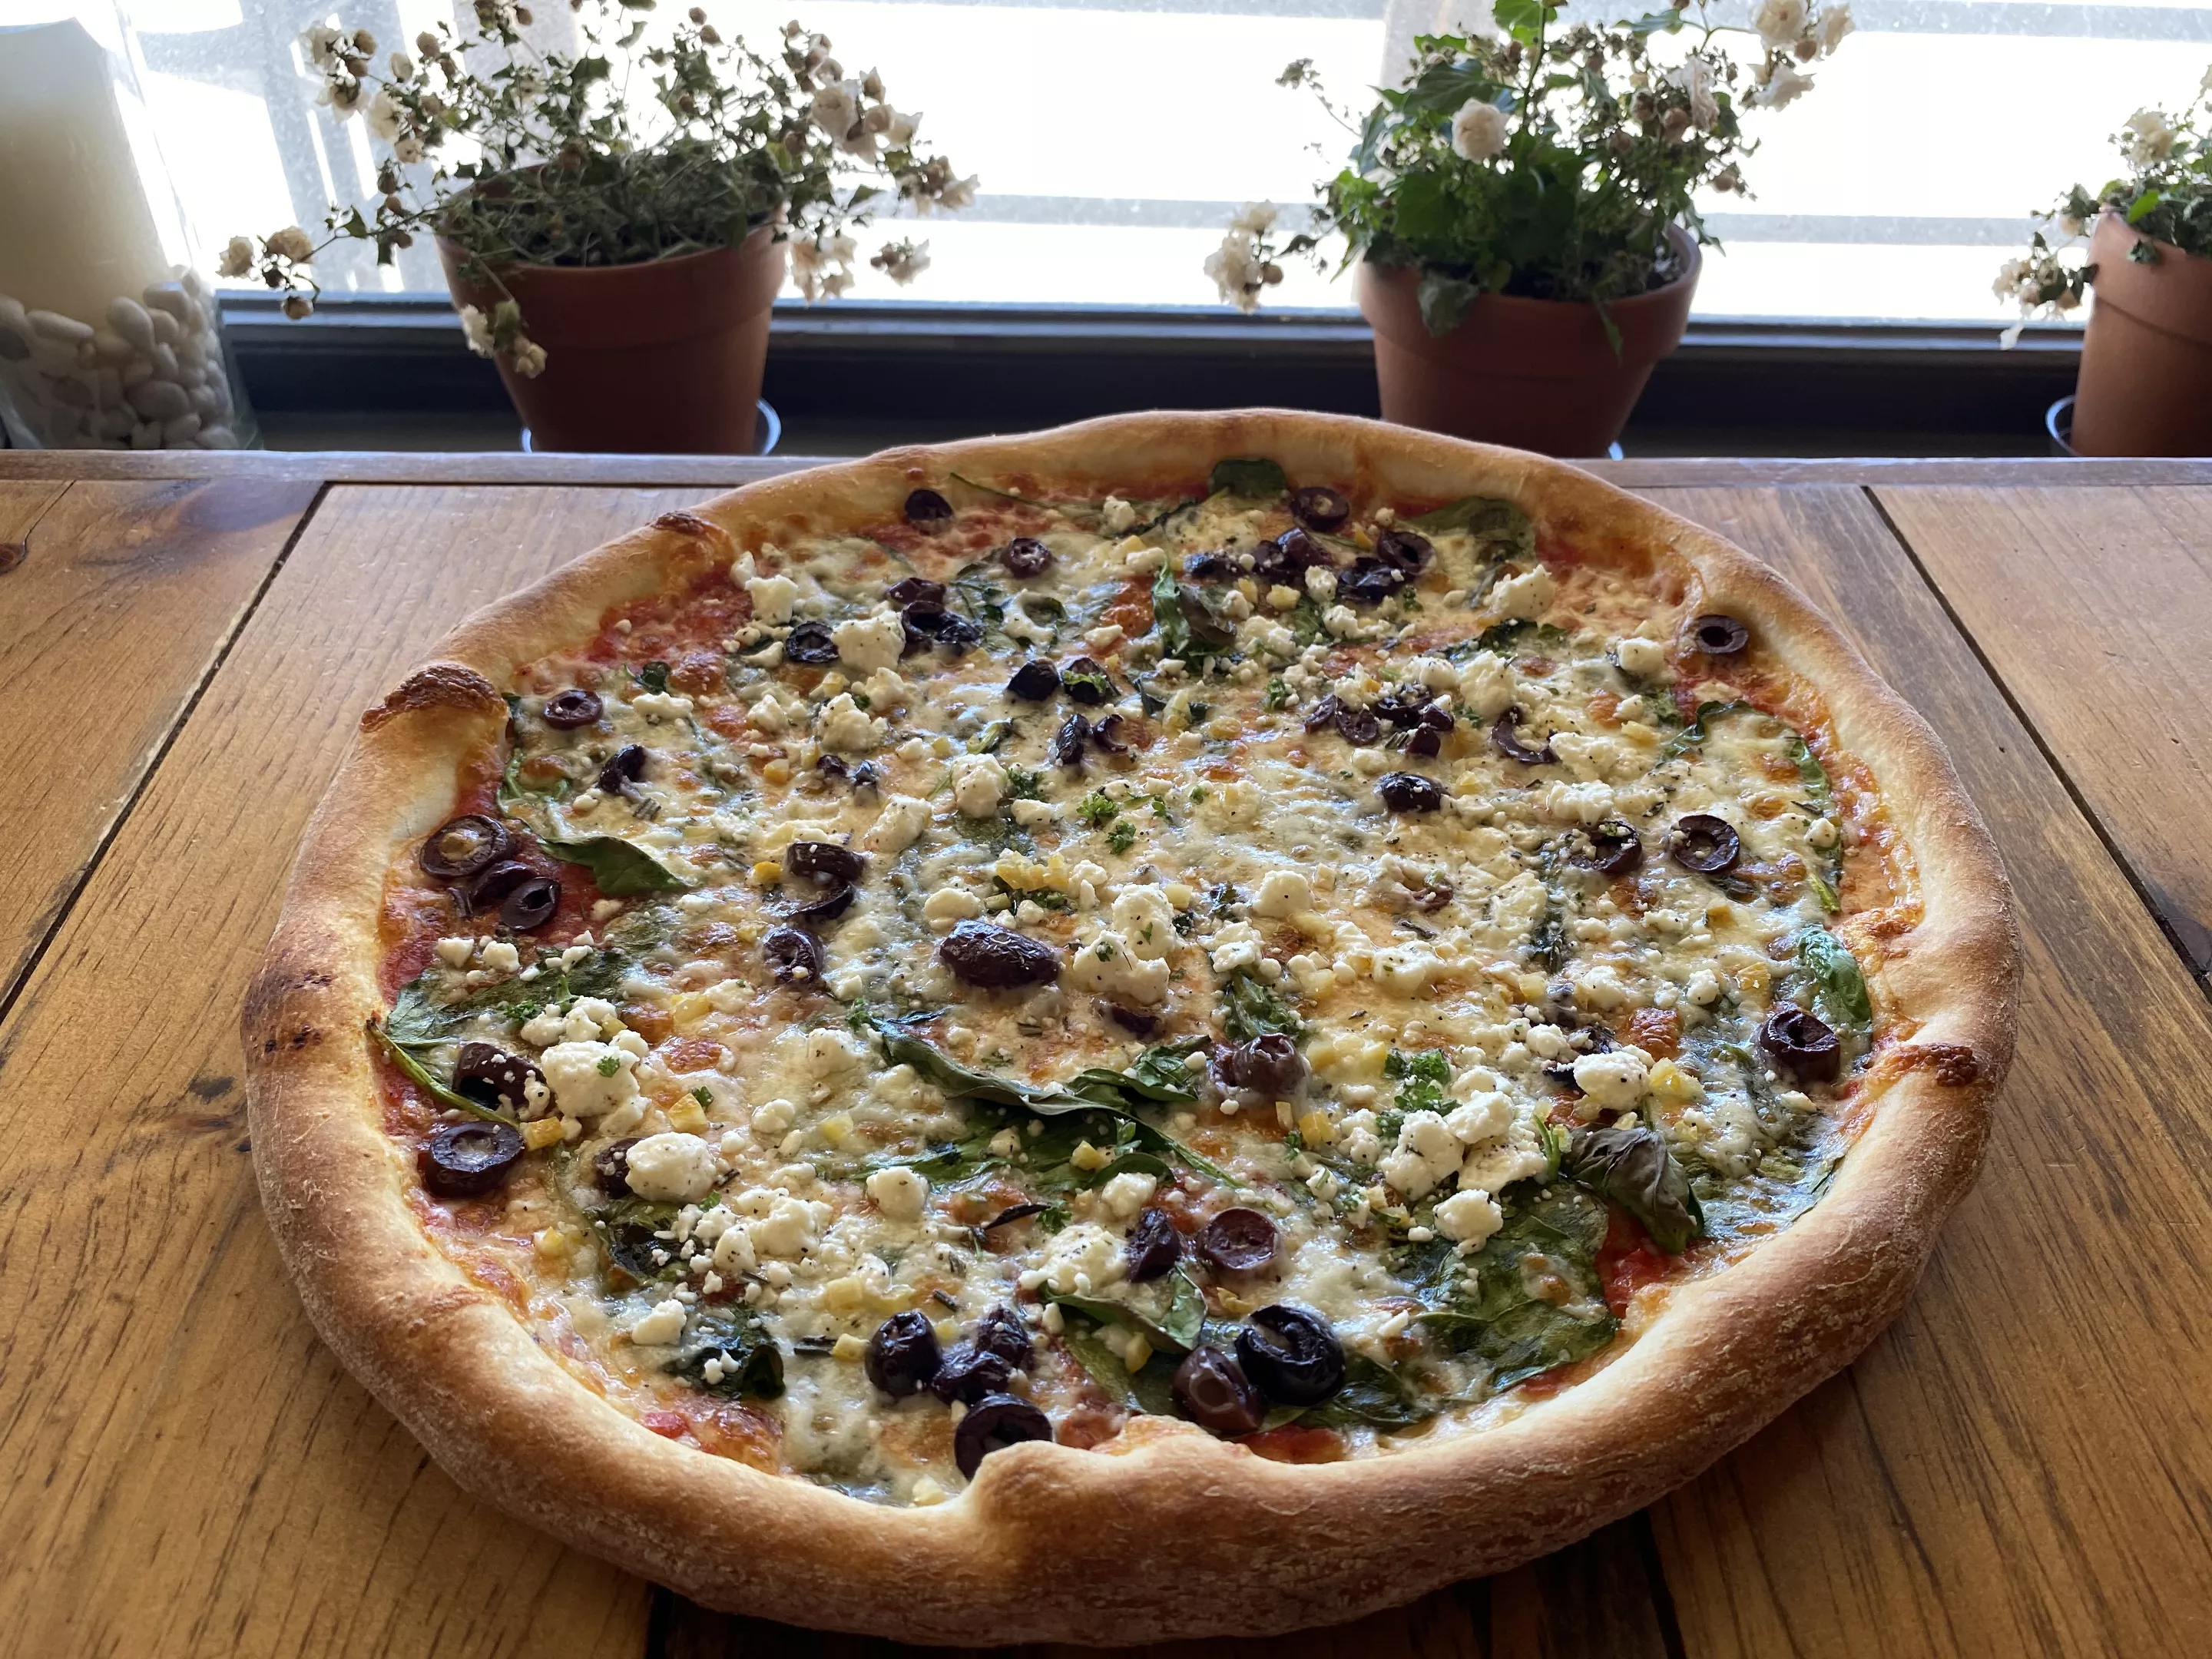
To correspond with this sign of spring, the pizzeria is sharing a recipe that suits the season. The Homesteader pie, a house special, “reminds me of spring,” chef-co-owner Silas Pollitt said. “It’s a very warm flavor. The feta is bright and tangy. It just screams spring to me.”
Pollitt and his longtime friend, Tyler Stratton, launched the original Stone’s Throw in their hometown of Fairfax in the fall of 2018. In January, along with Stratton’s wife, Allison, they opened a location in Richmond next to Volunteers Green. The restaurants moved to takeout service only in mid-March to minimize the risk of exposure to the coronavirus. Stone's Throw announced its decision to stop dine-in service two days before the state issued a similar order to restaurants and bars. The directive from Gov. Phil Scott was extended on Friday to May 15.
The transition has been a smooth one for Stone's Throw, Pollitt said. He noted that takeout orders have always been a majority of the business.
“The community is still really supporting us,” he said. “We’re still able to pay all our employees.”
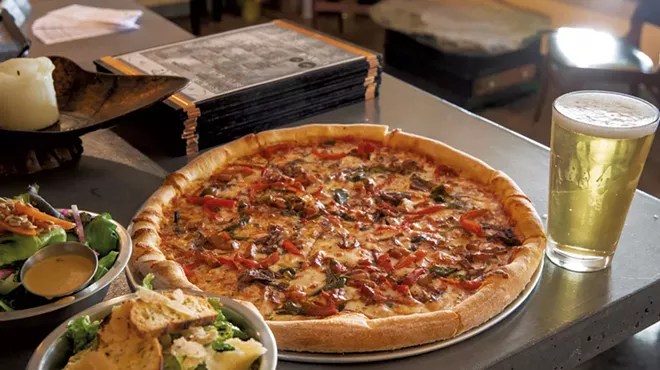
Each restaurant has a protected outdoor spot for pizza pickups: under an awning in Fairfax and a tent in Richmond. But for people who want to make their own pizza, Stone's Throw is sharing its recipe for the Homesteader, a house pie topped by feta cheese, olives and spinach and touched off by the zing of preserved lemon. (Start preserving now — it takes a month!)
“People are really leaning on comfort food right now,” Pollitt said. “And pizza is communal. Making pizza is a fun thing to do with your family, especially if you have nothing else to do and you’ve been locked in your house.”
Homesteader Pizza
“It’s salty and briny and pungent and vegetal, as it lights up the taste buds heading into the warmer months.” — Silas PollittIngredients:
- 1 pound pizza dough
- 6 ounces crushed tomato
- Grated Parmesan or Pecorino Romano
- 1 cup baby spinach
- 4 ounces shredded whole milk mozzarella (or 1/3 ounce dollops of fresh mozzarella)
- 2 ounces sliced Greek or kalamata olives
- 2 ounces crumbled feta
- 1 tablespoon preserved lemon
- Chopped fresh herbs (parsley, oregano, rosemary)
- Extra virgin olive oil
- Preheat the oven to 500 degrees. If you have pizza stones, let them slowly come up to temperature. If you don’t have a set of pizza stones, just flip a cookie sheet upside down.
- Buy a pound of your favorite pizza dough (most pizza restaurants will sell it, and it’s available frozen) and let proof for 20 minutes at room temperature. If you’re feeling lucky, throw the dough out to a 16(ish)-inch disk yourself. Using a rolling pin or wine bottle to roll out the dough is also perfectly acceptable for home pizza-making, but the crust won’t be as defined.
- Place the stretched dough onto a floured wooden pizza peel or cutting board.
- Evenly distribute crushed tomato over the dough, leaving a 1-inch border around the outside for the crust. Sprinkle the Parmesan/Romano and spinach over the tomato, then sprinkle the mozzarella, olives, feta and preserved lemon.
- Slide the pizza onto the heated pizza stone or cookie sheet and cook for 8-10 minutes. As all ovens are slightly different, use your best judgement and remove at your preferred doneness.
- Once the pizza is done, remove and let cool for two minutes. Cut and dress with fresh herbs, and then drizzle with olive oil. The smell of singed flour, toasted cheese, briny lemon and fresh herbs will fill the house and wow your family and other quarantine-mates.
- Feel free to make two while the oven is hot. No harm in leftovers.
Homemade Dough
Makes three 12-ounce balls or two 18-ounce ballsIngredients:
- 1 1/2 cups cold water
- 1.8 ounces extra virgin olive oil
- 1/10 ounce (2.85 grams) fresh/brick yeast
- 2 ounces poolish (pre-fermented flour mixture)
- 1 1/3 pounds all-purpose flour
- 0.12 ounce (3.3 grams) kosher salt
(For poolish, mix 1 ounce water, 1 ounce flour and 1 gram yeast and let sit overnight.)
- Mix yeast, water, poolish and olive oil well. Mix in flour mechanically for five minutes or by hand for 10 minutes, turning and stretching the dough to develop gluten until it resembles pizza dough.
- Cut individual doughs after mixing and let sit in refrigerator overnight if possible.
Preserved Lemon
- Cut lemons into quarters (rind and all), cover in kosher salt and place in a jar, leaving at room temperature for about a month. Add peppercorns, coriander or spices of your choice.
- When ready to use, rinse and pat dry, slice away the flesh and pith, and finely mince the rind. The purely distilled citrus flavors add a tremendously refreshing punch to a wide array of dishes.
(Preserved lemon can also be purchased at some stores.)
Editor’s note: Because it's important to limit trips to the grocery store, you can use toppings of choice that you have at home, and then stock up on Homesteader ingredients on your next trip to the store.
Tags: Recipes , pizza , Stone's Throw Pizza , home cooking , quarantine , Richmond , Fairfax , spring flavors , Stone's Throw Pizza (Richmond) , Stone's Throw Pizza (Fairfax) , Stone's Throw Pizza (Charlotte) , Web Only , Image
Monday, April 6, 2020

Most of us are stuck at home with far more meals to feed ourselves than normal. Some have added a second full-time job of caring for kids and managing their schoolwork. We’re trying to minimize our trips to buy ingredients. When we do venture out, there is pressure to be efficient, but also flexible if favorite or desired items are out of stock.
On the plus side, in between juggling the rest of our lives from home, we have more time to simmer up homemade meals and bake, if Instagram parades of crusty loaves are any indication.
For some people, cooking can be relaxing. Especially if someone else does the dishes. (Assign the kids clean-up duties and award them extra credit for life skills.)
Whichever camp you fall in, our Home on the Range cooking column is here to help. We’ll offer a couple of simple, flexible recipes each week, including some from local chefs — many of whom are also cooking more at home these days.
This first recipe is an example of a basic method with lots of options to use what you have on hand. I cooked it a couple weeks ago over FaceTime with my brother-in-law, Conor. He used chicken; I stuck with vegetables. I had coconut milk on hand; he didn’t and used plain yogurt.
Conor and my youngest sister, Julia, are thirtysomethings expecting their first baby in mid-June. She’s a great cook but needs a break, so he’s trying to step up to cook a couple times a week.
What he lacks in kitchen experience, Conor makes up in willingness to learn. (Sorry, Con, I’ve got to share how you didn’t know the difference between a tablespoon (big T) and teaspoon (little t), resulting in a very spicy pasta sauce.) What I’m trying to say is, if Conor can do it, so can you.
The results have been pretty good; Julia has given Conor a solid B+ on our last two efforts. After we cook, my husband and I sit down to eat “with” them. It connects us regularly in a way we wouldn’t have experienced when we were living our busy, pre-pandemic lives in NYC and Vermont, respectively. (See this recent Stuck in Vermont episode for a brother and sister who’ve been doing this for several years.)
For a few hours, our worries fade to the background while we focus on feeding those we love.
Roasted Cauliflower and Chickpea Curry (Optional Chicken)
Makes about 4 servings (more if using chicken).Ingredients
For optional chicken:
- ½ cup plain yogurt (sub: the thick top layer from a can of full-fat coconut milk)
- 1 to 2 teaspoons curry powder, to taste
- ½ teaspoon coarse salt
- 1 pound skinless, boneless chicken breasts or thighs, trimmed and cut into bite-size cubes
- About half a large head of cauliflower, including stem and ribbed leaves, cut into bite-size pieces (sub: broccoli, or 1 pound turnips or all-purpose potatoes, peeled and cut into bite-size pieces)
- 2 tablespoons oil, plus a little for oiling the chicken pan if needed (coconut, canola, olive)
- 3 teaspoons curry powder, divided
- 2 teaspoons coarse salt, divided
- 1 large onion, diced
- 3 to 4 garlic cloves, minced
- 1-inch chunk fresh ginger, peeled and finely grated, or ½ teaspoon powdered ginger
- About 1½ cups (14-ounce can) diced tomatoes (sub: whole or crushed tomatoes; if using whole tomatoes, break them up with hands or use kitchen scissors to snip them before adding)
- 1 (15-ounce) can chickpeas, drained and rinsed (sub: cooked or canned beans or lentils)
- 1 pound fresh spinach or 10-ounce package frozen, thawed and squeezed as dry as possible (sub: baby kale or ribboned chard; 1½ cups thawed frozen peas)
- 1 cup coconut milk (sub: ½ cup plain yogurt or heavy cream, or skip)
- If using chicken, at least 30 minutes and up to several hours before you plan to start cooking, whisk together yogurt, 1 teaspoon curry powder and salt. Taste and add curry powder if desired. Stir in chicken and refrigerate, covered.
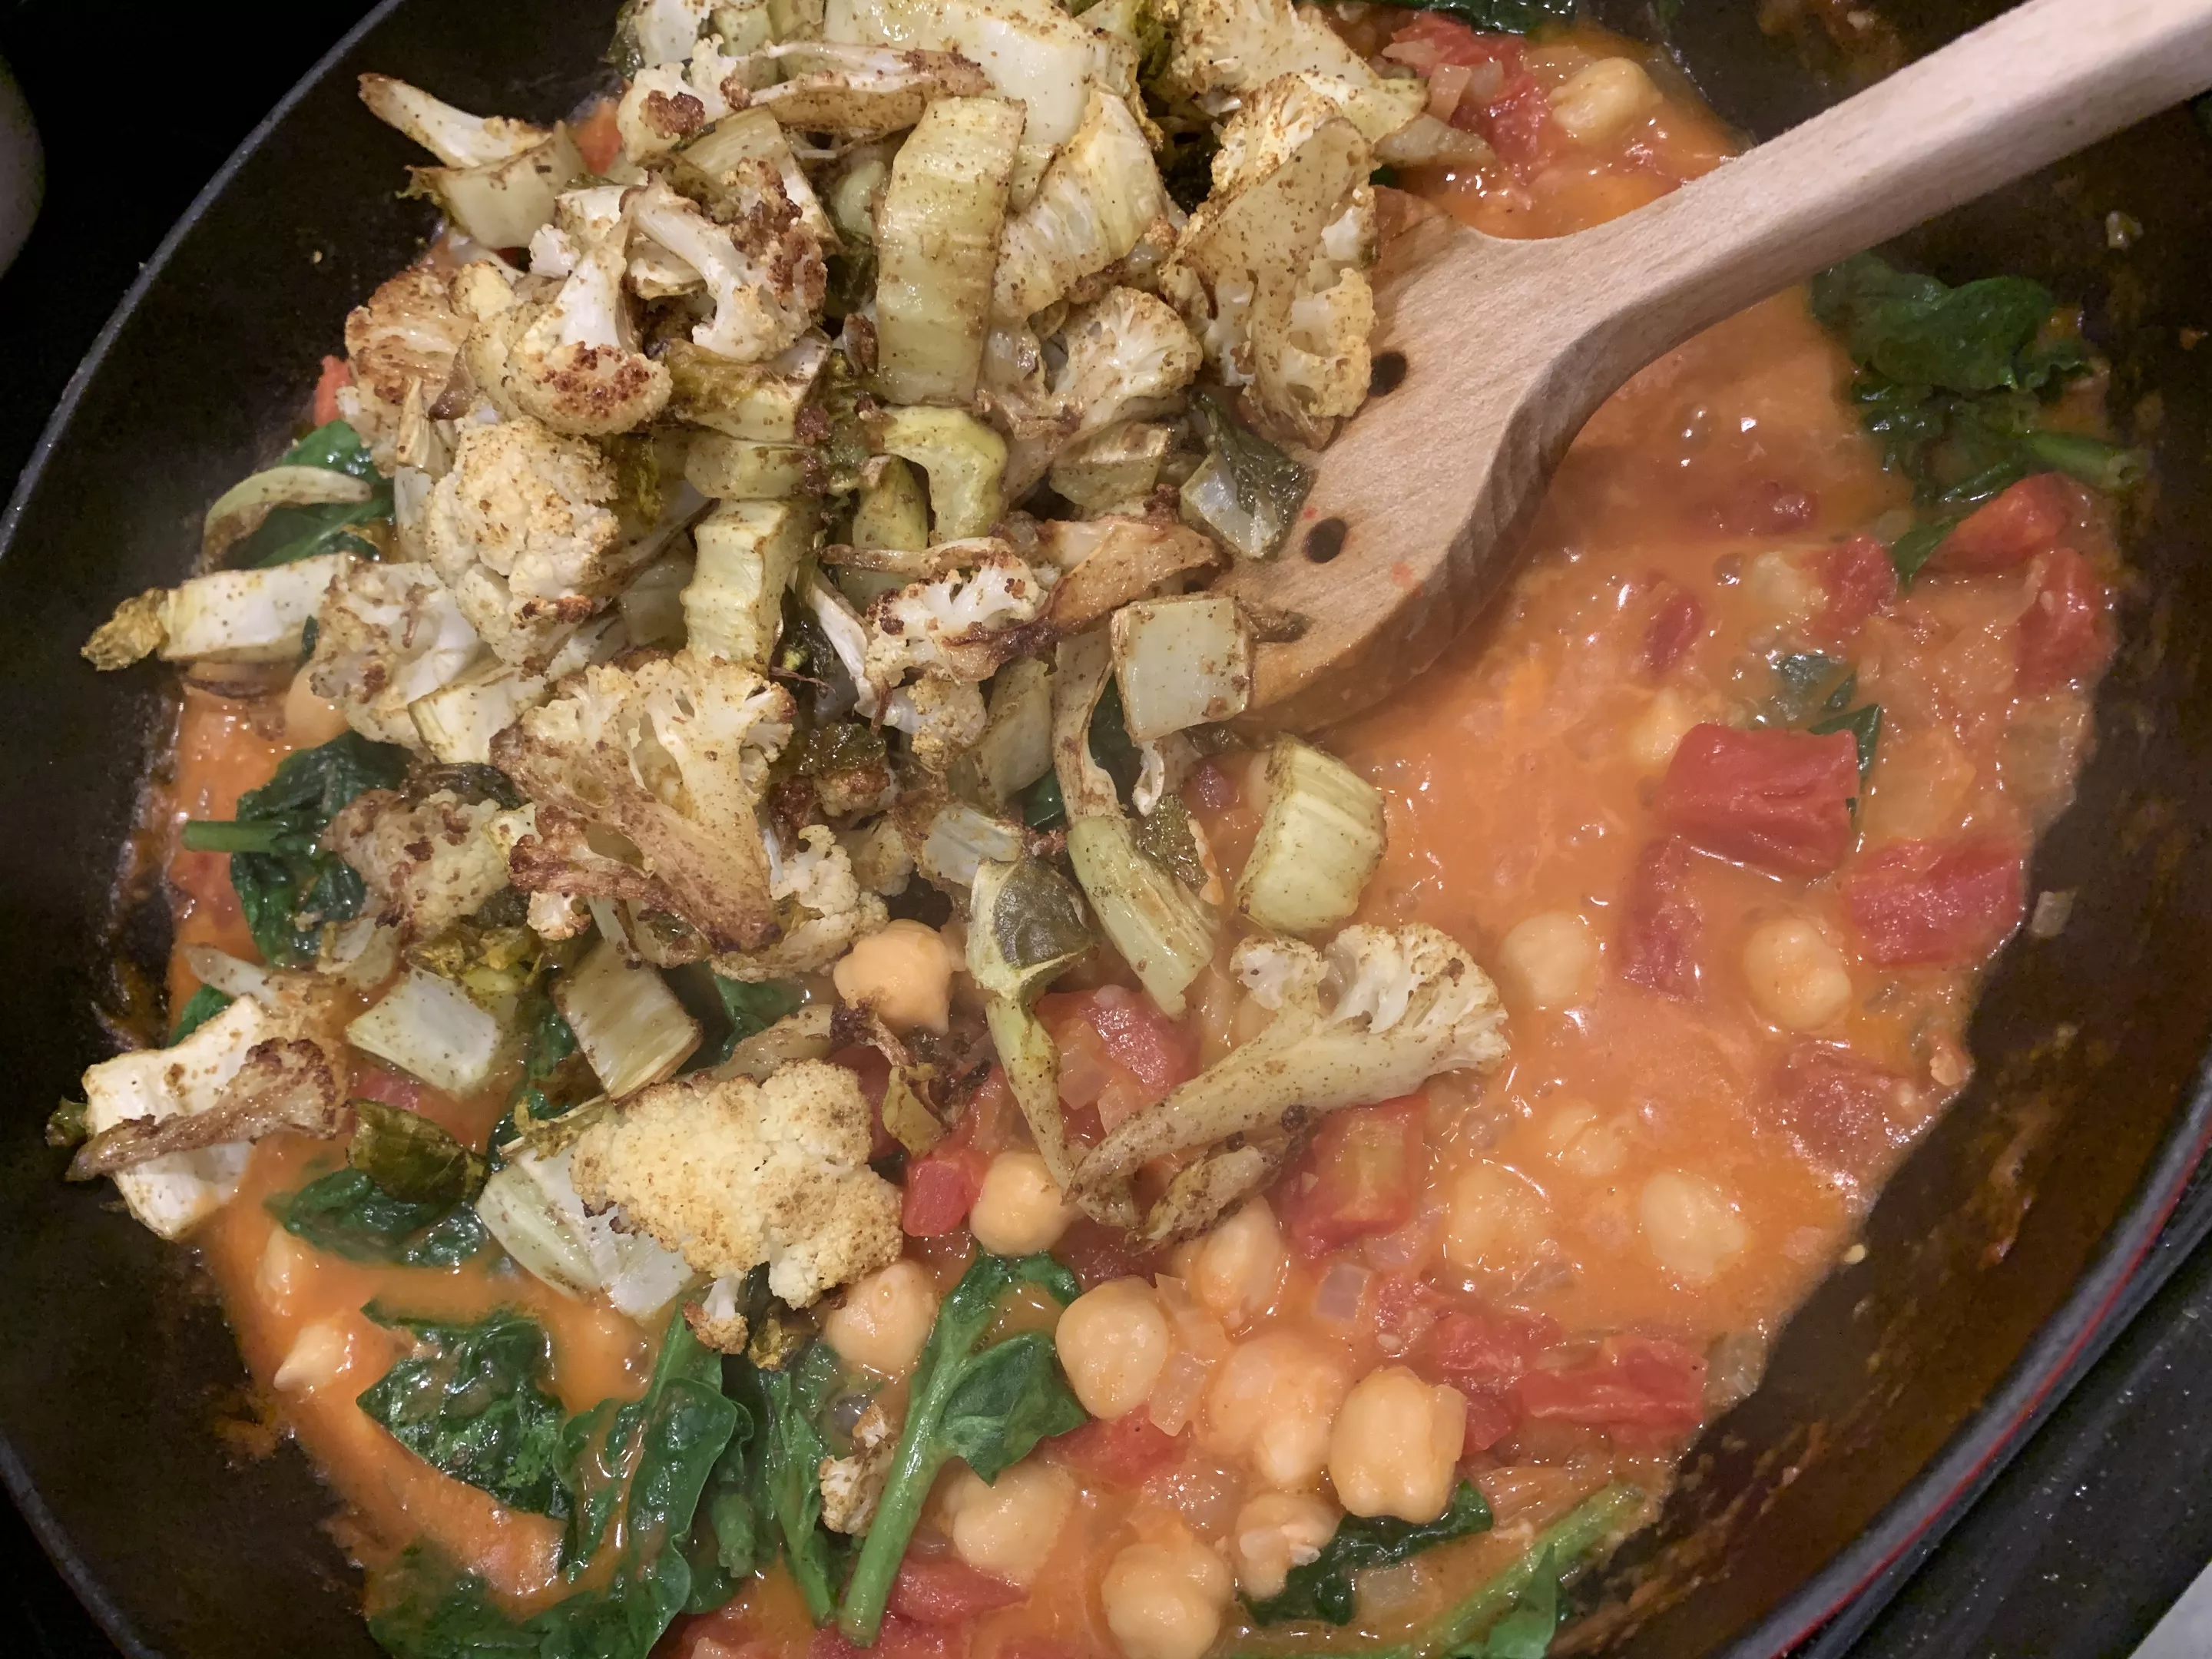
- Heat oven to 375 degrees. On a rimmed baking sheet or shallow roasting pan, toss cauliflower with 1 tablespoon of oil, 1½ teaspoons curry powder and ½ teaspoon coarse salt. If using chicken, lightly oil another rimmed baking sheet or roasting pan and spread marinated chicken evenly in the pan. Roast cauliflower and chicken for about 20 to 25 minutes until browned and chicken is cooked through, stirring each pan once. Set aside.
- In a large sauté pan, heat remaining tablespoon oil over medium-high heat. When a drop of water sizzles in the oil, add onion with ½ teaspoon salt and cook, stirring occasionally, 4 to 5 minutes until softened. Reduce heat to medium and stir in garlic, ginger and remaining 1 ½ teaspoons curry powder. Cook for 1 minute until fragrant. Add tomatoes and remaining teaspoon salt to the pan. Stir to combine and scrape up any brown bits from bottom of pan.
- Stir in chickpeas, spinach and coconut milk. Cover to wilt spinach for about 3 minutes. Uncover and stir. Stir in roasted cauliflower and chicken, if using. Bring to a simmer and add a little water if needed to keep it saucy. Simmer gently (especially if using yogurt) for about 5 to 7 minutes until everything is hot. Taste and add more curry powder or salt as desired. Serve over rice.
Got cooking questions? Feel free to email them to [email protected].
Tags: Recipes , home cooking , curry , Web Only , Image
Thursday, February 6, 2020

“Why don’t we try going vegan for a month?” he proposed. (Unrelated to climate change, he also suggested going alcohol-free for a month, but we agreed these two experiments should not be simultaneous.)
It took us a while, between travel and the holidays, work commitments and way too much cheese in our fridge, but we finally carved out three weeks and started our experiment about a week ago.
Tags: vegan , climate change , Knead Bakery , Revolution Kitchen , Stone Soup , Miss Weinerz , Leunig's Bistro & Café , Donnell Collins , Butch + Babe's , Web Only , Image
Tuesday, December 20, 2016

Usually, the only accoutrement I like with a cheese plate is a good knife and a box of crackers (Patchwork Farm & Bakery’s “Everyday Matzoh” crackers, here’s to you). But it’s the holiday season and I’m feeling fancy.
To accompany your decked-out holiday cheeseboard, here are four minimal-effort trappings to complement that great Vermont dairy.
Tags: cheese , Oxford Companion to Cheese , Catherine Donnelly , holidays , recipes , Image , Image , Web Only
Thursday, August 11, 2016

The salsa's simplicity makes it an unfussy last-minute addition to a meal, but the modest preparation is hardly a reflection of the taste. Gremolata adds a wallop of flavor that enhances the profile of a dish without throwing it off balance; it's bright parsley, a bite of lemon rind and the mellow sweetness that comes from crushing garlic to a paste under the heel of your knife.
Tags: vegetarian , vegan , parsley , condiment , recipe , herb , image , recipes , Image , Web Only